Pages

Monday, December 27, 2010

Cookies Baking In A Closed Oven

I don't know about everyone, but for a lot of people Christmas is inherently linked to baking.  Maybe it’s the fruit cake.  Wait, is the cake they sell at the store even count as baking?  I mean, I know it’s baked, but it’s more like a paste by the time you unwrap it and everything.  I have respect for the dish as an acquired taste that some really dig.  I, on the other hand, am not interested in acquiring this taste.

But I digress.  I have been doing me some baking and figured that I would share.  I usually try new things during Christmas.  Sure, I bake the favorites (we shared Chocolate Chip cookies and I'm certain we discussed the snickerdoodles) but I like to try other stuff too.  Pivotal to this is the internet; a mighty tool of information-sharing and (on more than an occasional basis) a source of information.

So, with my meager baking utensils in hand and a tiny kitchen, I set off to bake up a minor storm to fulfill some vague suggestions that they might be received as gifts.  As part of this effort, I present to you some cookie brittle and coconut-lime biscotti.  If you've scrolled through already, you will probably have noticed that I only attached one recipe; I attached the recipe for the brittle.  Why no biscotti recipe? 

Its not a family secret or anything, I can assure you of that much.  I didn't include the recipe because I believe I used a little too much coconut and not enough lime.  The result?  The coconut totally took over the cookie and the only point where I started to detect the lime was during the second baking; I could smell the lime, however, still no taste.  Because of this, I'm not going to share quite yet.  This requires a re-bake with some adjustment.  When I get it all Goldilocks'd, I'll post it up, okay?


Almond Cranberry Crispy Brittle

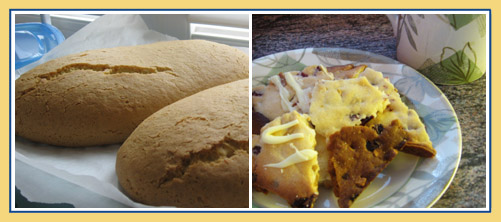
The infamous biscotti, so harmless in loaf-form but so dreaded for double baking (left).  Before you get all hesitant and such, you should know that the double-bake is well worth the effort you put into it.  Mmm... Double baked crunchiness!  However, if you don't like baking twice for crunch, consider the cookie brittle instead (right).  You bake once, pressed out really thin and, boom, you have crunchy, yummy treats!

What You'll Need:
  • 1 cup "I Can't Believe Its Not Butter" margarine
  • 2 tsp pure vanilla extract
  • 1 cup sugar
  • 1/2 tsp kosher salt
  • 2 cups all-purpose flour, sifted
  • 1 cup toasted almond chunks (see below)
  • 3/4 cup dried cranberries
  • white chocolate chips for decorative purposes

How It's Done:
  1. Preheat your oven to about 350F. (The rack should be around the middle position of your oven for proper cooking.)
  2. Toast the almond bits.  (In a dry, non-greased fry pan over medium heat, toast the almond pieces until they turn from the light off-white color that they are in the package/bin.)
  3. Soften the margarine however you like and set aside for a short while.  (I just let it hang out in a dish and leave the dish on my oven while that ramps up as well.  Two birds, one stone.  All right.)
  4. While butter cools, sift together the salt and the flour and set aside.  (I also chose to measure out everything else at this point too because I'm picky like that.  Thumbs up for streamlining!)
  5. Transfer the butter to your mixing bowl and add the sugar and cream for a short span.
  6. Add in the vanilla extract and mix until dispersed out.
  7. Add the flour and mix to combine.  (My dough was a lot like really thick cookie dough at this point.  It was probably the margarine because I find that baking with margarine makes things a little bit stickier than butter.)
  8. Add in the toasted nuts first, making sure they're combined.
  9. Add in the cranberries, turning the mixture over until the berries are also pretty much throughout.
  10. Using a spatula, put half of the dough onto a tin-foiled baking sheet and then squish down until really thin and more-or-less even.
  11. Bake for 24 minutes in the oven; let the other half of the dough chill out in the fridge while you're baking it up.  (And then you can either set a timer and check back OR you can be like me and sit there watching it.  However, it should be noted that I only watched the first batch.  I was worried this was going to be an epic fail and then I'd be scraping it off of everything.  I realized after the fact that I had used tin foil.  Silly me.)
  12. Remove when the edges are dark brown and the middle is a lighter brown and let it cool down on the pan for a bit then transfer to a rack.  (I tried to lift the first batch out of the pan with very little success because it started to sag in the middle.  By letting it hang out on the pan for a bit and then moving it away, it was pretty firm and the transfer was super easy.)
  13. Bake up the second batch the same way.  (Same story, other half of the dough.)
  14. Let the almondy-cran-awesomeness cool entirely then break it into bits and hook it up with a home in an airtight container.  (I spread melted white chocolate chips and then spread it over one half.  If you do this, the brittle should then chill in the fridge for an hour or so to get everything all solid.)

This recipe was adapted based on the recipe for Chocolate Chip Cookie Brittle that I found on Shauna's site called 'Piece of Cake' (click here!).  It was a total 'stumbled upon' moment, whilst I was wandering aimlessly around on the internet.  The recipe totally worked out well (even given the fact that I didn't use chocolate chips and used almonds/cranberries instead).  I'd really like to try this with another flavor combination.  Not sure what yet.  I'm thinking something like... well, there's... oatmeal raisin?  Maybe that's a little plain Jane.  I'll keep thinking on it.  We'll talk again in the future!

Saturday, December 25, 2010

Merry, Happy Holiday Season!

Hey there!

It's Christmas time again (as most sites on the internet have probably already reminded you).  However, and just the same, I want to wish you and yours all the best of the holiday season no matter what holiday it is during this time of year that you are celebrating.  I wish you and yours all the best from me and mine.

May all the best come your way as you exchange gifts.  May all meetings with friends both near and far bring you happiness.  Should you be traveling, may you travel safely from your home to your destination.

Great tidings for all and, if you can spare some time from all the festivities (or perhaps in contribution to them), bake yourself up the perfect storm!

Sincerely,

KitchKem*

Monday, December 20, 2010

The Oven, The Bowl, and "The Chewy"

When I talk to other people about their family trips as kids, Disneyland or amusement parks almost always come up.  It is a reasonable trend; these places have candy, lots of bright colors and over-sized characters with whom to take pictures. 

I can't say that I didn't have these experiences as a kid.  I can, however, say that they aren't the most prominent ones.  Apparently, we went to Disneyland a whole bunch of times when I was 'too young to remember'. (Side note:  Does anyone else thing that parents say stuff like that when they don't want questions about things?  I mean, you can't really make an argument because they tell you why you can't remember!  In conclusion, quite infuriating.)

But I digress.  Anyway, as I was growing up, a lot of our trips became educational:  Disneyland (or Magic Kingdom) was replaced by Epcot; we went for more hikes; and car rides weren't direct to the beach but scenic routes with a historical sites (like old train stations) included.

Another thing I really remember is watching Bill Nye the Science Guy.  How popular is he throughout the world?  I'm wondering because I'm pretty sure that was a pretty awesome show.  It was so awesome, in fact, that they still used the videos to teach us a lesson in grade school.  Well, in retrospect,  I guess it could also have been a successful method of keeping us quiet and compliant.  Oh well!

So, just why are we talking about Bill Nye the Science Guy?  It is related, I promise you that much!  After a long while of being separated through time (and opportunity) from Bill Nye, I found Alton Brown while keeping the Food Network on the tv in the next room.  'Good Eats' is pretty neat because, instead of just telling you how to do things (mix ingredients, put in oven, consume) you also get tidbits *why* things work or historical facts.  Its sort of neat that way.

And also because it taught me how to make pretty awesome chocolate chip cookies.  Mine spread a little much for my liking, however, the fault is entirely mine; I was on a bit of a deadline and I didn't let the dough chill for as long as it probably should have.  The lesson I'm taking away from this is as follows: "If the recipe says chill the dough, make sure it is cold to the touch before proceeding."


"The Chewy" Chocolate Chip Cookies

Is there anything that smells as fantastic as melting butter?  I used a bowl over some simmering water to melt the butter slowly while I dealt with the other steps in preparation (top left).  Taking that melted butter and adding sugars, you get this awesome dark brown mixture that, when mixed vigorously until smooth, gives something that is tempting to spread on toast (top right).  Yes, I know it sounds gross, but it looks nearly like caramel!  Then, after the batter is completely mixed, the result looks pretty sweet on my oven mittens in natural light (bottom).  I may or may not have, shortly after, eaten about half of those.  ^__^;;;

What You'll Need:
  • 1 cup unsalted butter, melted
  • 2 1/4 cups bread flour (To the bulk foods store!  I know, a little silly, but I don't make bread often so I do not commonly have this stuff just lying around.  Also, I don't make these often enough to justify buying a whole bag.)
  • 1 tsp kosher salt
  • 1 tsp baking soda
  • 1/4 cup sugar (Sweet.  Literally!)
  • 1 1/4 cups brown sugar (I finally found a brown sugar puck!  I tried to find a clay pot, but there aren't any plant stores nearby.  I was very sad, but the puck works just the same I think.)
  • 1 egg
  • 1 egg yolk
  • 2 tbsp milk (I told you before that I don't drink a lot of milk so I had to use the soy milk.  I didn't find a large difference so I'd say the switch was an overall win.)
  • 1 1/2 tsp Vanilla extract (Mmm... Vanilla....)
  • 2 cups semi sweet chocolate chips (I only used about 1 cup.  I like my cookies with some chocolate, not the other way around.  I will say that I have indeed done it with two cups and, I don't know what chips other people use, but it is just way too much chocolate for me!)

How It's Done:
  1. Preheat the cookie baker to 375F.
  2. Put the butter in a dish over a bowl of hot water and let it melt away.  (Alternatively, you can do it in the microwave, but I like the control that you get with the double burner set-up rather than having to camp out the microwave to prevent nuclear hot butter from going just about everywhere.  Its a cleaning time reduction quirk of mine.)
  3. Sift together the flour, salt and baking soda then set aside.  (I added the salt straight then sifted the rest.  I also used a whisk.  Just for good measure.)
  4. Cream the butter and sugars on medium speed with a mixer.  (I didn't have a mixer and so I attacked the butter and sugars with a whisk.  I would highly suggest using the mixer though.  These babies were much easier to make when I had one!)
  5. Add the egg, yolk, milk and vanilla to the butter/sugars and mix until smooth and homogeneous.
  6. Slowly mix in the dry ingredients from before and make sure there are no lumps.
  7. Dump in the chocolate chips of awesome-ness!
  8. Shove the dough in the fridge and chill for a while.
  9. Drop spoonfuls of the mixture onto a parchment covered baking sheet, 6 cookies per batch.  (The cookies do spread out so by only making six at a time, you can get some good space and prevent one large cookie catastrophe.  Unless you like eating these as much as I do.  In that case, maybe test how many you can fit on a sheet at one time for the first batch! ^__^)
  10. Bake for 12-14 minutes until golden (and a little bit darker around the edges).
  11. Remove and let cool on the sheet for a bit then move to a rack.  (I only let them cool for a few seconds before moving them because... I've dropped a few batches in the past and they have crumbled and it gets everywhere and... well, I had mentioned about my aversion to drawn out cooking, yes?  Anyway, by letting them cool for a short while, they get a bit firm around the edges before I move 'em! ^__^  In short, crisis averted!)
  12. Store them in an airtight container and enjoy!

This recipe is brought to you by Alton Brown via 'Good Eats'.  However, because its hard to watch an episode and remember everything exactly as you saw it, Food Network is pretty cool about hosting all the recipes.  That being said, the original recipe (without all of the short-cuts I had to take due to a lack of mixer and, well, a couple of other kitchen-related devices) can be found on the Food Network website.  Oh and, while you're there, you may also want to check out his recipe for coconut cake done with a real coconut.  There's something to be said about fresh ingredients, you know!

Saturday, December 18, 2010

Buttery, Nutty, Goodness Me!

Okay, don't take it personally, but I baked since we last spoke. It was entirely on a whim and late at night (so you know that the picture isn't going to be as swell as it was when I baked on Sunday afternoon). I had mentioned before but, darn, do I sound like an addict don't I! Okay, this doesn't really count as "true baking" because I cheated. A lot.

While surfing on the internet, I was interested in the concept of using cake batter to make cookies. So many variations, so many different flavors, but how to pick one? Well, I was going to make pumpkin spice but, as luck would have it, Walmart was out of Spice Cake Mix. I like chocolate as much as the next person, but I like it in limited quantities. This recipe makes a little bit more than a limited quantity. Thusly, chocolate was also out. Yellow Cake and French Vanilla are a little plain but have very admirable traits; they can be wielded and turned into flavorful things. So, Vanilla Cake Mix in hand, I started to hike off down the eisle. And that's when the Butter Pecan Cake Mix caught my eye. How intriguing!

Vanilla lost this round, but it still remains our most favorite flavor. The Vanilla bean; from many origins and yet each one with a delicate, creamy, and (at times) earth aroma and taste. Need I say more?

Back to the cookies though. Most of the recipes call for oil of some kind. I, however, so not use a lot of vegetable oil so it is a bit of a loss if I get an entire container of it. You can, I have read, substitute oils for fruit purees with little flavor loss. But, just in case, what is the harm in picking a fruit puree that is more complementary?

Ingredient no. 2: Pear puree (because you know apple is a little cliche).

Last, but certainly not least, have to take an egg out and make sure that its at room temp.

Mix it all together and drop by the spoonful onto a baking sheet. Everything in my reading suggested that I should have been able to roll the dough. If you like dough-gloves, by all means, go for eet! I, however, like my hands in the useful conformation (getting dough on everything in the kitchen is a little cumbersome) so I dropped by spoonful and made imperfectly shaped cookies. There's just something about irregular cookies that I like. They're kind of like snowflakes; each one is different and unique in its own right.

My apartment smelled like buttery pecan goodness for a solid two hours. Baking, for the win!


Boxed Cake Mix Cookies

Mmm... Pecan buttery goodness.  Apologies for no natural lighting.  That's just what you get when you spontaneously feel like baking short-cut cookies at night after the sun has gone down.  The moon doesn't hit my side of the building until I'm nestled in bed.  I heart you guys, but all of my systems start to give up around 11:00 pm.

You will need:
  • 1 pkg Betty Crocker Cake Mix (The possibilities is relatively limited so I can't state that they're endless per se, but rather that the choices are many)
  • 1/3 cup vegetable oil (Or vegetable oil substitute of your choosing. It sounds icky, but prune puree has always served me well if you feel like the choices are too great. Also, I use baby food to fill this purpose. Then I eat the rest because fruit is awesome. Though apples out-of-hand can't be beat. More on that earlier.)
  • 1 large egg
  • Handful of white chocolate chips (For some creative flare!)

How it's done:
  1. Preheat the oven up to 350F. (Trust your knowledge of your oven on this one. However you usually set it for a recipe that needs it to be 350F; there's variation in oven sometimes.)
  2. Mix all of the ingredients together in a large bowl.
  3. Using a small spoon, drop spoonfuls onto a prepared parchment-covered cookie sheet.
  4. Place a couple of chocolate chips on the top of the drops. (I used white chocolate chips, but I don't see why you couldn't use those round chocolate discs they have at the bulk food store or nuts of some kind.)
  5. Place the cookie sheet in the middle of the oven and bake for 10 minutes. (8-10 minutes, depending. The cookies, if you're using a light mix, should get light brown around the edges and you will know they are done.)
  6. Pull them out and let them cool 5 minutes on the cookie sheet then transfer to a rack (still on the paper) to cool completely. (When baking these, I noticed that trying to pull them off of the paper tore them to bits. I'm not saying I was complaining because I got to eat a whole batch of them, but I do learn from my mistakes. In the interest of sharing - and my waistline - I let them cool off completely then peeled them off the paper.)
  7. Store in an air-tight container and then spread the wealth!

This recipe was loosely adapted from a handful of different recipes hosted on Allrecipes.com. They all seem to like using different proportions of egg and oil. So, I made a compromised adaptation and was pretty pleased with the results. I would fully encourage you to check out Allrecipes.com for the variety of Cake Mix Cookies (give it a click or search 'Cake Mix Cookies' with the search function). All that said, go forth and bake up a storm mightly crafters of yummy treats! ^_^

p.s. Hopefully, we will be able to have a great heart-to-heart about cookies of many different kinds. I have to bake up some Christmas presents after all!

Wednesday, December 8, 2010

Sugar, Spice and Everything Nice

That's what Chai Snickerdoodles are made of.  Well, in all honesty, there's some other stuff in there too.  Like butter (heck, yes!), flour and eggs.  Basically, some par-for-the-course cookie ingredients.  The cookies themselves, however, are not par.  They're more like birdies.  Or eagles.  But, let's break away from this entire golf metaphor and move on to something with which I am far more familiar.  (Random point of interest: I am certifiably horrible at golf, despite promising though sporadic performances during visits to the driving range.)

I wanted to reference this recipe hardcore back when the oven was a carbon container and the Easy-Off was but a pipe dream at the end of a very long and dark tunnel.  However, because I bake these more often than just once, I held off and gave up another recipe in its place.

My friend, Hannah, first introduced me to this recipe in high school when we had a Christmas bake-off.  Nothing says holidays like spending precious moments with friends in the kitchen making something that tastes wonderful.  I mean to say that those are memories that you carry with you for a while.  Thusly, we are talking about it right now!

Before I give up and we get into the baking portion of this, I do have a random observation about this cookie recipe in particular.  I have made these a grand total of... six (?) times.  Each and every single time that I have made these cookies they come out differently.  For example, the first time, they were more rotund and puffy.  Subsequent times, they have been flat, crispy, chewy and probably combinations/variations thereof.  I have no doubt that they will turn out slightly different for you as well.  However, no matter what they look like or the firmness of them (crunchy vs. soft) they are still lovely little things.  Even with coffee.

So, without further delay, let us get down to the baking!

p.s.  You know what I miss most about baking at home?  Multiple baking sheets.  You wouldn't believe how much longer it takes to bake with only one cookie sheet.  Maybe Santa will leave one for me under the Christmas tree.  (Mom, if you're reading this, MASSIVE HINT!)(And much love, duh! ^_^)


Chai Snickerdoodles


Now don't those look yummy?  Spicy, sugary cookies that stand alone or walk in a friendly manner with a cup of coffee (or tea, I'm not biased).  On a completely unrelated note, I am totally cooking on Sunday afternoons and not evenings more often; just look at how well daylight and my camera get along! ^__^


You will need:
  • 2 cups sugar (Granulated, ftw!)
  • 2 tsp ground cinnamon
  • 1 tsp ground ginger
  • 1 tsp pumpkin pie spice (I'm not brand-name dropping, but the one I used was the Club House one.  The original recipe, which is linked at the bottom, calls for cardamom but this works just as well)
  • 1/2 tsp ground allspice
  • 1 cup butter, soft (You can also use margarine; I've gone both ways.  No snickers, please!  I just realized that is sort of a pun.  No pun intended and no dirty-joke chuckling please!)
  • 2 large eggs
  • 1 1/2 tsp vanilla extract
  • 2 3/4 cups all purpose flour
  • 1/4 tsp salt (I totally 'pinch' this out; no measuring equipment required)
  • 2 tsp cream of tartar
  • 1 tsp baking soda

How it's done:
  1. Preheat your oven to 350F.
  2. Combine the sugar and spices in a bowl then scoop out 1/2 cup of it and set it aside.  (You know that good things can only come from spiced sugar).
  3. Whisk (or sift) together the flour, salt, cream of tartar and baking soda and set aside for subsequent use.
  4. Cream the butter (or margarine) with the sugar mixture until light and fluffy.  (This step is really spicy so be careful not to sneeze into your cookies.  Or, if you do, don't mention it when handing out the results of your hard work.  Just saying.)
  5. Add in the eggs one at a time.
  6. Mix in the vanilla extract.
  7. Slowly incorporate the flour mixture into the wet junk and stir until there is no streaking or dry clumps.
  8. Grab walnut-sized chunks of dough, roll into nice round balls in your hands.
  9. Roll the balls through the sugar that you set aside before and set them down (as balls) on a baking sheet lined with parchment paper.  (This is especially easy if you spread the sugar over a plate with a lid or a super shallow bowl.  I like the plate method, but I'm not going to preach it to you.)
  10. Bake for 11-13 minutes.  (Like we've seen before, this is going to depend on your oven and how you and your oven interact.  Mine is picky, so is my mum's, so the oven times vary a little.)
  11. Take the cookies out of the oven and let them just hang out on the cookie sheet for a bit before transferring them to a rack to cool completely.
  12. Store 'em up in an airtight container or appropriately decorated cookie tin. (It is December after all!)


The recipe that is listed above was retrieved from the internet a long while back (I will not detail when because that would place a date on my still ambiguous countenance).  I do know for sure that it was retrieved from Nicole over at Baking Bites.  Check out Chai Snickerdoodles on her site and, if you have some time, definitely check out the other neat stuff there too; she's a great blogger!  Plus, there are also reviews on baking stuff and products that are totally useful.  ^_^


KitchKem is currently rocking House MD season three on her DVD player.

Friday, November 26, 2010

Taking Care of Business

What up my blog-following friends?

Man, has it been eternity since I last posted hasn't it?  My apologies, buddies!  I have baked recently, but didn't have the time to throw up a post here.  Do you remember that I had mentioned how much like a black hole November is?  The work is piled up high until you're backed between a hard place and more textbooks and reports than you care to specify.

However, I am now free.  Well, free of course work at least until January.  There is still marking to do, but we'll not get into that right now.  Perhaps later when I decide to bake decadent chocolate cookies to get through the entire pile.  They have to be done by next Monday so there is some work to be done yet.  Not stressful stuff though, I just have to get through it.  I suppose that's true of most things!

Anyway, getting back to the baking that I did and didn't exactly tell you right afterwards.  So, I had really wanted to bake for quite some time now as I'm sure you're aware.  I also had a pantry that was quite lacking and had to purchase some all-around baking stuff anyway.  Like flour.  You don't realize how much you use it until, well, you don't have it.  Plus, I had some left over cereal bits that, for the life of me, I couldn't bring myself to just throw out.  So, baking with left-over cereal?  This calls for some internet research.

I managed to find myself a recipe for Cornflake Chocolate Chip Cookies by Sneh at Cook Republic.   The only problem was that my cereal bits were Special K Vanilla Almond.  I have to say, I did pause to ponder on this for a short time.  Was it worth risking disappointment given I had a major project due in three days?  It didn't take long to realize that either way I wouldn't be working on my project so, disappointment or not, this was a good step away from my project for a short while.  A break for a brain-refresh.

Wrapping up this blurb, this is a bit of an adaptation of that recipe reflecting the stuff I keep around in my kitchen a bit.  Case in point: I don't drink a lot of milk.  My bad.  These cookies came out okay though it needs to be said that they are crumbly and not the chewy kind.  By my reckoning, they are more of a dipping cookie to be enjoyed with a hot beverage I think.  I might try to tweak this a little bit more in the future.


Cereal Crumble Cookies

From the above, you can see the speckling from the Special K bits that I used.  I know they look a little yellow but they actually came out a paler creme colour.  My camera isn't super co-operative (I take pictures with the flash off because otherwise all my cookies look white.  Yes, even the double chocolate ones.)


You will need:
  • 9 Tbsp margarine
  • 1/2 cup white sugar (The original recipe called for 2/3 cup but I figured since the cereal appeared to be frosted, I didn't want to blow people -- and their sweet teeth -- out of the water).
  • 1 tsp pure vanilla extract
  • 1 1/4 cup a.p. flour
  • 1 1/2 tsp baking powder
  • 1/4 tsp salt
  • 1 Tbsp soy milk
  • 1 1/2 cups Special K Vanilla Almond bits (By 'bits' I mean the crumbs that you get in the bottom of the box after you've eaten all the big chunks and almond in the top.  Not the dust but the smaller bits.  You can use a sieve to get rid of the dustiness! ^_^)
  • 1/3 cup chocolate chips (This is approximate because, in measuring chocolate chips, I look at the dough and then use 'handfuls' which is by no means a standard unit.  I would say for chocolate chips, add to your liking.)


How it’s done:
  1. Preheat your oven to 350F. (My oven is from the dark ages and only has F degrees on it, sorry!)
  2. Cream the margarine, vanilla extract and sugar until they are light an fluffy with a sturdy wooden spoon.  (The margarine will likely look lighter and the mixture won't seem quite as 'sandy' in texture from the sugar.  The use of a sturdy bowl is also suggested.  I was using this floppy plastic salad bowl because its the biggest one that I have and, let me tell you, that was by no means easy.)
  3. Add the flour.
  4. Get the milk stirred in.  The dough might look a little sticky at this point but that's okay because there's still more to be added! (Plus, we're lucky enough to have fingers that can be licked afterwards.  Just saying. ^_^) 
  5. Fold in the Sp. K bits and make sure that they are well-dispersed throughout the dough.
  6. Fold in the amount of chocolate chips to your liking and make sure that everything is well-distributed.
  7. Prepare a baking sheet with some parchment paper. (Remember to dampen it according to the package.  My mum's friend didn't dampen and the stuff will actually start to deteriorate along the edges during the baking.  It was a bit of a shock for my mother's friend as I'm sure you can imagine.
  8. Roll dough into balls about the size of a walnut (another subjective measurement!) and place them on the cookie sheet with the paper, using a fork or spoon to press the dough balls down slightly. (I didn't do this with my first batch and had to whip open the oven halfway through to get 'er done.  These cookies don't seem to spread out very much.  Or at least mine didn't. <_<;; )
  9. Bake for 13 minutes.  (This will likely vary depending on your own oven's cooking preferences.  Mine can be a little picky.  I think it might have it out for me at times.  Just jokes; that would be insane! ^_^)
  10. Pull the cookies out of the oven with some mitts and let sit for 5 minutes on the tray before shifting them over to a wire rack to cool completely.
  11. Store those dippers in an airtight container after they've cooled completely.
Makes about 30 cookies

This recipe was adapted for sure, but the adaptation would never have been possible without the original recipe for Cornflake Chocolate Chip Cookies that I found online.  To make a long story short, this adaptation was made possible by a recipe courtesy of Cook Republic!
  

KitchKem is swaying away to How The West Was Won by Katie Herzig on her iTunes.

Thursday, November 18, 2010

Ball and Chain

No cookies this week.  I won't lie to you here, I have gotten really, really close twice now.  Once this past weekend when I got all of the stuff that I needed (to make cheat cookies, I'm sorry to say) and once earlier tonight when I really just wanted to take a deep breath and make my place smell like baked goodness.

Yet, each time, I am sorry to say that I was defeated by time and fatigue.  When someone synthesizes a drug that is awesome like caffeine without the crash, sign me up for the clinical trial.  In the mean time, let's all have another cup of coffee (which, at this point, would be my third) and take a load off for a few moments, okay?  Mmm... coffee.

November is quite a funny time of the year.  There's no way I can know what you're up to but, where I am, the workload seems to increase to a fever pitch.  You have two papers and a midterm?  Let's throw another midterm and a formal lab report in there and see how everything comes together.  Well, this term, its a large paper and a presentation that, I have to say, I have been avoiding.  Fear of failure (failing school, failing the super, f.a.i.l.).

As far as I'm concerned, oral presentations are the purest form of torture.  They are like a paper in that they must be heavily researched and backed but, when it comes down to presentation and questions, the research falls away and, nakedly, you stand there.  It is like being a wounded gazelle on the Savanah that sees the lions descending.

But, I digress.  Whining about school is not the point here!  In light of the super business that was going on this week (and in effort to lessen the amount of hang-ups), I spent my weekend making Mom Soup and Mom's Fish Dish.  There is no way this starving student is skipping dinner or eating microwave dinners when there are awesome left-overs in the fridge.  Paired with steamed veg, how can you go wrong?

Here's a recipe for the Crock-Pot (CP) that I find quite tasty.  My mum does it in the oven for about 1.5 hours and it comes out about the same (except that the top potatoes come out crispy!).  I'm still working out some of the kinks, but, hey, life's about learning right?


Mom's Fish Bake 
(Done the C-P way)

Bringing together a lot of the goods.  The only thing missing here are the fish filets; they're in the sink just out of the picture to the right.  Once they get thawed, they're a little picky to handle!

You will need:
  • 4 frozen Basa fish filets, thawed
  • 1 sweet onion
  • 1 pkg. grape tomatoes, sliced or approx. 2 ripe tomatoes (We grow these suckers in the garden at home and, let me tell you, this dish is like a whole other world of awesome when they're ripe and right off the vine.  Seriously.)
  • 9-10 baby potatoes, sliced extremely thinly (My mom also uses plain potatoes as well, so don't feel bound to the baby ones)
  • Assorted spices (I like cumin, coriander, curry powder, paprika, and garlic powder, however, you have a lot of choice with this.  It all depends on what you like and you can definitely experiment!)
  • 1 tbsp extra virgin olive oil
  • 1/2 cup water (When my Mum does it in the oven, she doesn't put the water in, however, I'm a big fan of the broth to eat this more like a stew so I add the extra liquid.  It doesn't seem to affect flavor and makes cleaning the basin a lot easier).
  • 6-inch chunk of cellery, cut in half
  • 5-6 baby carrots


How it’s done:
No preheating necessary, aren't you glad?
  1. Give the onion a good chop into thin strips.
  2. Cut the tomato and potatoes into slices.  The tomato slices can be a bit on the meaty side if you like, but make sure that the potatoes are cut ultra thin; otherwise, the potatoes won't cook all the way through and its a little icky.  (Yes, that it is the technical term ^_^;; ). 
  3. Assembly of this is pretty easy so don't worry if it seems awkward.
  4. Take your empty C-P basin (mine is about 3 qrts) and start with a layer of onion at the bottom.
  5. Next layer is fish!  Take two thawed fillets and lay them over the onion layer. (I try to make sure that they don't over lap but I don't know that it makes a super big difference).
  6. Spice up the fish fillets by sprinkling your chosen spices over them.
  7. Take your tomato slices and lie them over the fish.
    [Edit:Upon reading this for the zillionth time, I realized that I never said anything more about the celery and carrots.  After you get the tomato layer in, put one chunk of celery on either end and disperse carrots between tomatoes in that layer.  I do this for flavor.  I'm not sure if it makes a difference, but it certainly doesn't hurt!]
  8. Follow the tomato layer by a layer of thinly sliced potatoes. 
  9. Next layer is more sweet onions!
  10. Lay the last two fillets of fish over the onion layer and spice up their surface!
  11. Cover this with a layer of tomatoes and then follow with a layer of potatoes.
  12. Drizzle the top of the layered goodness with the tablespoon of extra-virgin olive oil.
  13. Pour the 1/2 cup of water in by pouring it into the cracks along the edges so as not to disturb the spice on top of the potatoes.
  14. Lid on and let it cook on high for 3 hours.  After three hours check the potatoes on top for doneness.  (This is the part of the recipe I haven't quite figured out how to make work for the C-P.  My Mum puts the potatoes on top but I think in the future I might put the tomatoes on top because some of the top potatoes never seem to cook quite right.  I wish you better luck than I have had!).
Serves 3 hungry people or 4 people with some salad and veggies! ^__^

After getting all the layers set up and tossing the lid on, I sit there and watch it cook (left).  Then I get bored because, honestly, its like watching paint dry.  However, I will say that, even if the C-P dish looks really full, the junk inside shrinks down so it doesn't look so full after its done.  I forgot to take a picture before I divided it, but, on the right, is one portion.  Yes, not exactly the most attractive thing ever, but I like to eat it just the same!


The recipe above is courtesy of my Mum.  I'm not sure if its an original because, when asked, she says that she got the recipe from her brother.  The trail, sadly, goes quite cold after that point.  Regardless, from me to you, it is yummy.  Speaking of which, it is just about that time.  I'm going to go heat me up some fishy goodness.  Enjoy guys!


KitchKem is currently rocking out to Raise Your Glass by P!nk and hating referencing with a passion.

Tuesday, November 9, 2010

Mission: Accomplished!

Ladies and gentlemen, we have touch-down.  Or rather, lift-off.  That's right!  I'm happy to say that, yes, I sucked up my hesitancy to clean the gee-darn oven and just got it done.  Perhaps it was out of need to avoid other things or simply to get something simple accomplished as a temporary confidence boost, however, it is now done.

Let me just tell you that Easy-Off really did work wonders.  I had my doubts when I cracked open the oven in the early morning, shook up the compressed cylindrical can and sprayed up the whole inside of the oven, door included.  I'm not sure if you have an oven full of burnt of your own but, if you do, I found it really easy to clean everything off with a little scrubbing after spraying it in the morning (around 7 am) and then cleaning it off when I got home from work in the evening.  However, as I say, it is totally, completely, utterly and awesomely clean.

This can only mean one thing: please, please let's bake something soon! ^_^

p.s.  Fish-bake from the Crock-pot for dinner.  One word for you: yum!

The disaster as it appeared after sweeping out most of what was loose on the surfaces (top left).  This caked-on junk was not to last, however, as it was covered entirely in the awesome white foam of Easy-Off (top right).  The current state of affairs (bottom).  Oh, yes.  Baking will ensue.

Thursday, November 4, 2010

A Funny Thing Happened On The Way To The Oven

Or 'How To Wash Your Floor Via Inundation From Your Sink'
  
Now, given that this post is not starting with 'Easy-Off Is The Greatest Thing Since Sliced Bread' or 'The Burnt Came Off Then Caked On Me', you're probably fully aware that the burnt is still in the bottom of my oven.  I know I said I absolutely have to get this taken care of by Nov. 3 because Nov. 5th marks six weeks until Christmas.  That was a complete lie, wasn't it?  I daresay I have so much on my plate that I can't even keep track of days.  I'm losing them left, right and center, aren't I?

Well, regardless of my losing days, I still committed myself to getting it cleaned by the third and it isn't done.  I had every intention of getting this done but, as the actual title of this entry suggests, a funny thing happened before I could get to it.  You see, I wanted to thaw some fish to nom for dinner (cooking in the Crock-Pot as we speak, for the sake of over-sharing) so I threw it in the sink and ran the tap.  Then, smart cookie that I am (no baking pun intended), I put earplugs in and tended to other things.  Then the lights in my apartment turned off and back on again.

"What on earth could have caused -- must check fish!"

I don't know nor can I say for sure that the flicker of power is related (because the kitchen floor appears to be completely sealed at the seams) but it certainly got me moving.  In the kitchen where, standing in my stocking feet, my socks began to absorb the error of my ways.  Twenty minutes, two tea towels, one beach towel, a sponge mop and a big red bucket later and the kitchen floor got an unintended cleaning.  My mom says to look at the positive side of things so, if anything, I now know that my floor is absolutely clean!  Indirect score!

Long story short(er), after cleaning the kitchen floor then setting up the fish to cook (which I sadly did not nom for dinner tonight but will certainly enjoy tomorrow... and the day after that, and the day after that) I had too many more things to take care of and the Easy-Off kept its home under the sink. 

However, I'm thinking that this is all for the better.  On one hand, I totally, utterly and completely screwed up the date and would have felt like a fool.  Save number one.  The kitchen floor has been mopped clean.  Indirect, but still makes save number two.  Lastly, if I had gone through the with Friday plan, I likely would have been stuck with a massive over-abundance of cookies to eat.  This, then, would have caused me to gain weight which would cause me to stress and go to the gym and that would ultimately lead to a decrease in my productivity.  That brings us up to three saves.  Plus, I have dinner plans on Sunday this week so even if I start on Monday (as I now plan to) I wouldn't have time to bake before Monday.  There you have it, a total of four saves.

One screw-up for four saves?  That certainly seems to be a fair trade to me under the circumstances.  Mind you, I didn't get as much writing done today as I would have liked.  I suppose tomorrow I will have to get up much earlier and get 'er done!

Provided I don't have an attempted recipe for you, let's talk about something else that I adore.  No, not science.  I assure you that if I were to do that, it would be the last time you and I spoke.  My mother has told me that I talk entirely too fast and in way too much detail.  Clearly, my abilities of knowledge transfer and translation need further improvement.  Welcome yet another goal for my four-year stretch!  But I digress so let's get back to it.  What I would like to talk about is apples.

I love 'em.  Oh, sweet, sweet accessory fruit.

I swear to you that I eat about an apple a day.  If the saying is true, this would be the most likely reason that I see the doctor at a rate of about three visits per annum (or rather, one yearly and the odd appointment for minor stuff).  With so many different kinds how you ever get bored of something that is so easy to eat out of hand? 

Apple uses certainly stretch far beyond that.  M likes apple cider and apple sauce but, after some bush-beating, I had to simply tell him that those things are for wusses.  Real (wo)men eat them straight from the tree, just as they come.  I jest, of course, because I, too, like apple sauce even if it means that many apples had to suffer to make it and regardless of losing fibre and nutrients from lack of peel.  All I can really say is, "You win some, you lose some."  Plus, the beauties eaten straight off the tree aren't necessarily the ones headed to the chopping block for applesauce-making purposes.  I swear they have an apple for everything!

Perhaps most adored or, if you prefer, the apple of my apple-consuming eye, is the apple pie application.  I haven't yet tried to make this elusive baked good that only makes it to our table on special occasions (sadly absent this Thanksgiving), but I think that I just might.  My G-mom used to make a mean one, not too sweet and all apple.  The 'Home Country' ones that they sell in the store, made by machines on a line, just aren't the same.  I think it’s the lack of heart in the machine.  Store-bought cookies are also quite lack-luster.  Aside from the frighteningly long list of stuff in them, that is.  There's no way the recipes I use are that complicated!

Okay, so I'm not an apple expert or an orchard consultant, but there's one more little detail concerning out-of-hand apples that we need to talk about.  That, my friends, is the difference based on size.  After a long conversation with C regarding this topic, we believe that apples can be divided into two main categories: dating and commitment.  The first, the dating apple, is generally fit-in-your hand sized and is appropriate for all occasions and circumstances without prior planning or consideration.  They are just enough apple for that 'I think that I would like an apple' fix.  The commitment apple, on the other hand, needs a little more consideration.  Not because you don't want to eat them, but because you want to enjoy the experience.  You want to make sure that you don't have to come back for seconds later (because then the apple is brown and, even though it still tastes just as good, brown apples are sort of off-putting and irksome).

All in all, apples are pretty awesome-sauce.  Pun most certainly intended!

The aforementioned difference between apple sizes.  On the left, we have the commitment apple.  Far larger than the dating apple, shown on the left, consumption of this apple clearly takes some more consideration.  Is the eater hungry enough to sit down and eat the whole thing?  The answer?  Heck, yes, hit me with the best commitment apple you got! ^_^

Friday, October 22, 2010

Nothing Holds Up Baking...

...like an oven full of burnt.  Now, before we get ahead of ourselves, the burnt part wasn't my fault.  I've burned this before (Remember the muffin paperweights?  That was burning of epic proportions!), but this is like caked-on carbon in the bottom of the oven.

I would bake regardless, however, I have had the unpleasant experience of burning something on the stove top (it was underneath the pot, this is not a habit of mine!) and having to fan the fire alarm to appease it once more.  The burning smell went away and didn't settle on anything.  On one hand, I now know for sure that my fire alarm certainly works; I don't have to press the test button and then scramble to figure out how to turn it off.

So, in the hopes of saving myself quite the scramble, I have swiped the Easy-Off from my mum and now just have to get some really old clothes to conquer the burnt.  I have, so far, had the Easy-Off for about a week now and have not made the slightest effort to clean it.  I'm still working on the clothes (apparently this cleaning business is quite messy!).

I am committed to getting this done, though, and am hoping to have good news soon!  If anything, I have to absolutely get it taken care of before Nov. 3.  Why?  Because Nov. 5th marks six weeks until Christmas.

And Christmas means lots and lots of glorious cookies for all!  ^_^

The stove seems so harmless, sitting there with its novelty spoon (left), but what ominous things it contains!  See that black cloud?  I daresay burnt is the enemy of baking if such a thing even exists (right).

Tuesday, October 19, 2010

The Dreaded First Post

So, maybe I’m making a big deal about this whole thing.  No, scrap the previous thought.  I’m definitely making a big deal about this whole thing.  I’m thinking some people take to this blogging thing like chocolate and mint but, as I’m sure you’ll figure out soon enough, I’m not exactly the best at checking in regularly.  Geez, if the children of my children ever find my diary attempt and get all hopeful because they want to glean something new about me, they will find I age about a year between entries.  How is that for anti-climatic?  My life is going to seem like a goat-song!


Its not, by the by.  Just, you know, for clarification.


Anyway, why put off the first post?  Well, I was going to wait until I had the chance to bake something, take a picture and yak about how the whole experience went for me.  However, I was getting antsy just looking at the blank page from before.  Driven by the haunting image of the empty page, I cracked open my baking book to see what recipes I had to share.  


There are quite a few that I like, and I have a feeling they are going to pop up sooner or later, but, for now, let’s talk box cake mix.  Easy to use, pretty good flavor (on average – I’ve had some pretty foul ones, not going to lie) and everything is mixed up for you already (i.e. no Bulk Barn trip).  Have you ever tried to bake with them a little bit outside of the rules on the side?  I have!  A few times, in fact, but none so good as blueberries, almonds and vanilla.


I obtained the recipe off of my mother who had had it since I was a little girl and in Brownies (or maybe it was Sparks, not sure) though I had never really taken a crack at it until I had to attend a Baby Shower Potluck.  


The whole week leading up to the shower I had been staying up super late (and, yes, it definitely started to show) so I didn’t have a lot of time to bake anything really complicated.  The night before the shower, I blew in from work, got washed up and baked this awesomeness in the oven.  The entire kitchen (and my bedroom, by extension) smelled ah-mazing (with a definite syllable-separation necessary).  I made the icing before leaving the next day and headed on my way.


I’m happy to report that the cake survive the 15 min bus ride and the block and a half walked to get there, though things were looking a little bit questionable when I nearly got attacked by a flock of geese.  You laugh, but those things are mighty vicious; they hiss and are just all manner of unpleasant.  


At the end of the day, I was still in one piece and the cake was completely gone!  I’d say that’s the highest compliment to be had ever!


Success! ^__^


Betty Crocker, Blueberries and I 
(or, Cheat Blueberry Almond Cake)

What looks like tar is actually baked blueberry glory.  For the win!


You will need:
For the goods:
  • 1 cup of dairy sour cream (the low fat stuff works totally fine, no worries).
  • 2 tbsp water
  • 3 eggs
  • 1 package of Betty Crocker Super Moist French Vanilla Cake Mix (See?  Cheating!)
  • 1 19-oz can of Blueberry pie filling (More cheating!  And, what’s more, is that it doesn’t matter what flavor of filling you use.  Apple, strawberry, cherry… I’m pretty sure they have a pie filling for everything imaginable).
  • 1/3 cup toasted almonds, sliced (“But, Liser, why aren’t they on the cake in the picture?” you ask.  Funny story: I didn’t have the recipe on me, bought the wrong ones, was too lazy to toast them myself and so omitted.  It worked out okay, though; you can never be sure with people and allergies these days and I don’t like to disclude people.  That’s just not cool).
To glaze the thing:
  • 1/2 cup icing sugar
  • 2 tbsp milk

How it’s done:
  1. Preheat your oven to 350F.
  2. Grease yourself up a pan to put the batter in.
  3. Mix the sour cream, water and eggs together.
  4. Stir in the cake mix from the package and stir until moistened.  The batter’s going to be a little lumpy but don’t worry about it.
  5. Spread the cake into your greased pan.
  6. Using a Goldilocks-sized spoon (not too big, not too small), drop the filling by the spoonful onto the batter.  (Okay, the recipe says 19-oz but, man, I don’t know if you’ve ever cracked one of those open but that’s a lot of filling!  What size pan were they using?  Long story short, having left over filling is totally okay; go with your gut when adding the filling.  Maybe you’re just ape for apples, who knows? ^_^).
  7. Bake until cake springs back; approx. 25-30 minutes.  (I used the time-honored poke-it-with-a-toothpick technique to test; you want to see that it comes out clean before pulling the cake on out).
  8. Pull the cake out and sprinkle with almonds.  (Or not, if you’re like me and bought the wrong ones!  I’m not perfect, what can I say?).
  9. While your cake is cooling, prepare the glaze by adding the milk to the sugar and mixing until smooth.
  10. Drizzle the top of the cake with glaze.  (If you make it and store it in the fridge, it may separate.  If this happens, make sure that its totally mixed up before you use it).
  11. Cut the cake into squares, serve and enjoy!

On writing this, I don’t know where this recipes comes from so I can’t reference properly.  My mom and I believe that it might come from a Betty Crocker Cookbook, given the simplicity of using a boxed cake mix.  Just because its simple, though, doesn’t mean it isn’t yummy!